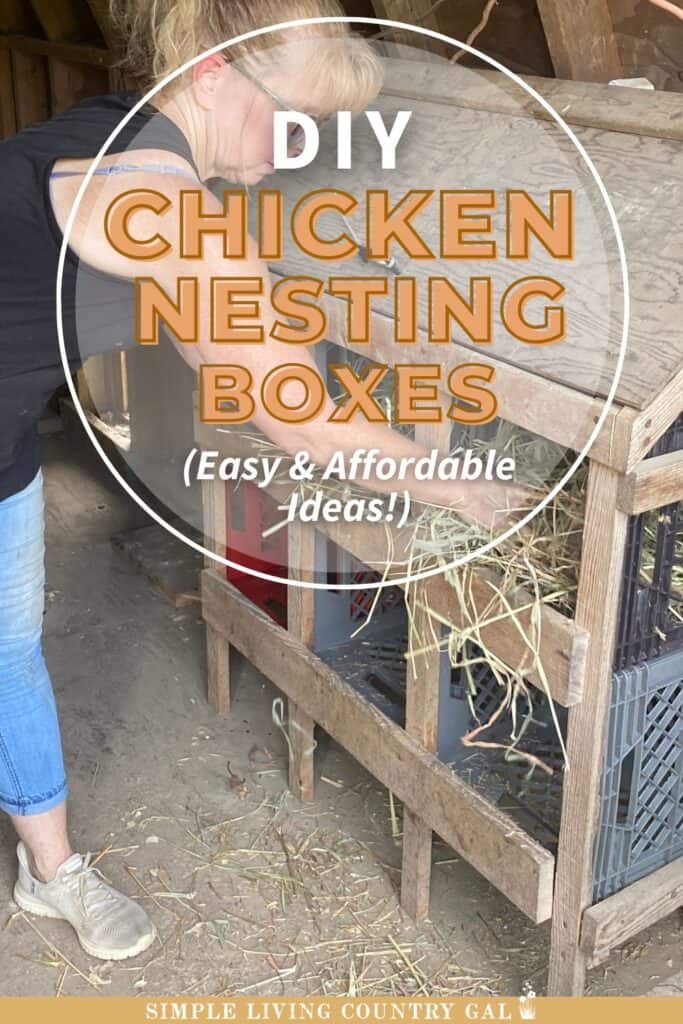
diy chicken nesting boxes on a budget
Looking for a cheap DIY solution for your chicken coop? This list of DIY chicken nesting boxes will help you build a cozy spot for your hens to lay their eggs, without spending a fortune.
Raising chickens doesn’t have to be expensive or complicated. With just a few creative ideas and some supplies you probably already have lying around, you can set up a safe nesting area for your flock.
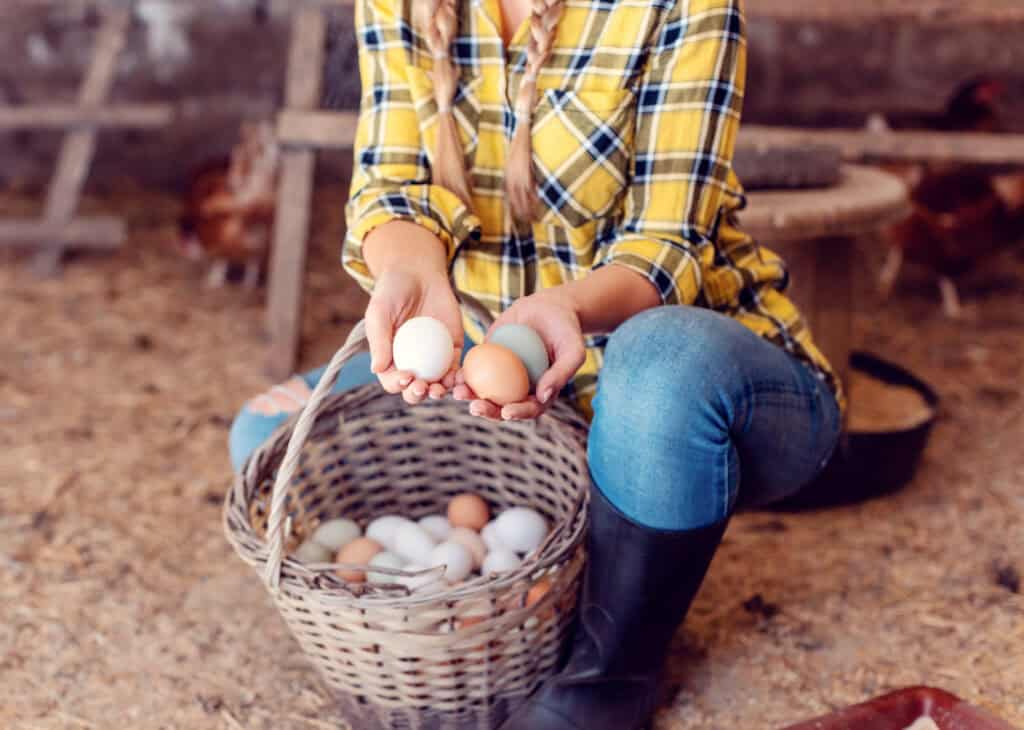
When we first started raising chickens, I couldn’t wait to get my hands on those fresh eggs. I heard stories about how much better they were and when I finally cracked into our first collection I wasn’t disappointed.
Eggs are one of the best parts of raising chickens!
They’re fresher, tastier, and the yolks are usually richer and brighter than what you find in the grocery store. But eggs are also fragile, which is why your nesting box setup matters more than you might think.
What is a nesting box?
A nesting box is simply a safe, comfortable spot where your hen feels secure enough to lay her egg. Think of it like a private bedroom for your chickens, it doesn’t need to be fancy, but it should meet a few basic needs.
A good nesting box is:
- Up off the ground – This keeps eggs safe from dampness, rodents, and other animals that might sneak into the coop. It also helps your hens feel more secure since many birds prefer a slightly elevated spot.
- Filled with soft bedding – Straw, pine shavings, or even shredded paper will cushion the eggs and help prevent cracks. Bedding also makes the box more inviting, encouraging hens to actually use it instead of laying in random corners of the coop.
- Somewhat enclosed – Chickens like privacy when laying, and an enclosed space helps them feel safe. A partially closed-in box also keeps eggs from rolling out and breaking on the coop floor.
SLCG Pro Tip: If your hens are ignoring the nesting boxes, try placing a fake egg (a ceramic, wooden, or even a golf ball) inside. This signals to them that it’s a safe and “approved” place to lay.
JarThenaAMCS 2Pcs Egg Bags with 7 Pouches Egg Collecting Basket Canvas Egg Gathering Bags for Farmhouse Garden Coop Hen Chicken Duck Goose Egg Storage, 8 x 2.6 Inch JIYUJIAHUA Egg Basket, Collapsible Mini Storage – Can Easily Load Eggs for Carrying and Collecting Eggs, Easy Washing, and Fast-drying, Country Primitive Farmhouse Style, DANLAN-001Xbopetda Egg Basket, Metal Egg Collecting Basket with Wood Handle, Round Farmhouse Storage Basket Organizer for Gathering Fresh Eggs, Kitchen Decor


How many nesting boxes do you need?
This is one of the most common questions for new chicken keepers. The good news? You don’t need a one-to-one ratio of boxes to hens.
A common rule of thumb:
- 1 box for every 3 large-breed hens
- 1 box for every 4 small-breed hens
Fun fact: Hens often take turns using the same favorite box, so you’ll rarely see them all full at once. Still, I always suggest building a few extra if you can.
PHOTO OF MANY EGGS IN ONE BOX
Here’s why:
- If multiple hens want to lay at the same time, there’s no fighting over a single box.
- Extra boxes give your flock room to grow without needing to redo your setup.
- More boxes mean less stress and fewer broken eggs.
Example: If you have 12 hens, aim for at least 4 boxes. If you have 20, go with 6–7.
What can you use for DIY nesting boxes?
Here’s the fun part, you don’t need to buy anything new. Nesting boxes can be made out of almost anything that’s sturdy, washable, and the right size.
Look around your home or homestead for:
- Wash tubs
- Buckets (5-gallon works great)
- Plastic milk crates
- Wooden boxes or old drawers
- Kitty litter containers
- Plastic totes
- Heavy-duty plastic baskets
SLCG Pro Tip: Plastic containers are often easier to scrub clean than wood, and a smooth surface helps prevent mites and bacteria from hiding in cracks.
Size Guide: Aim for about 12″ wide × 12″ deep × 12″ high for most standard hens. Larger breeds like Brahmas or Jersey Giants may appreciate a bit more space, while bantams can use something smaller.
Even if your container doesn’t match those dimensions perfectly, don’t stress, hens are adaptable. As long as it’s cozy, has bedding, and feels safe, they’ll happily make it their spot.
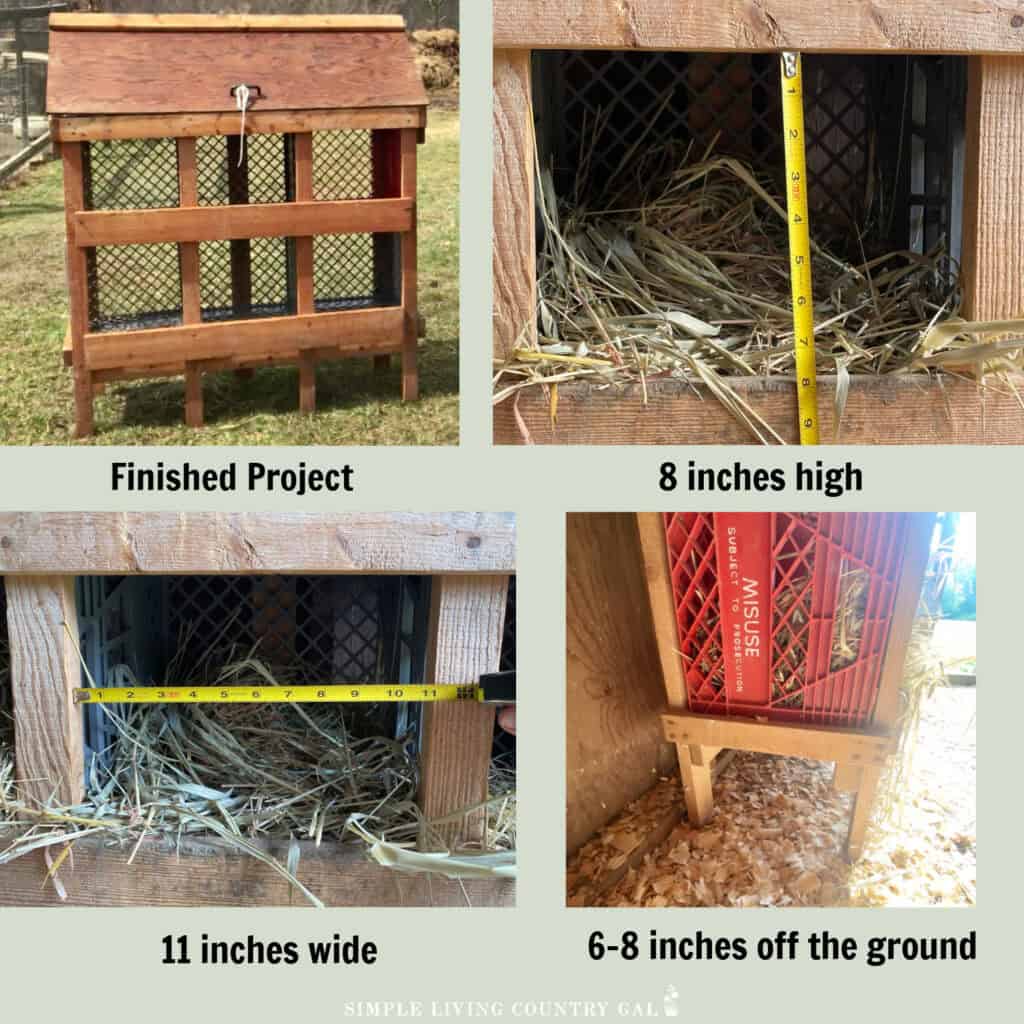
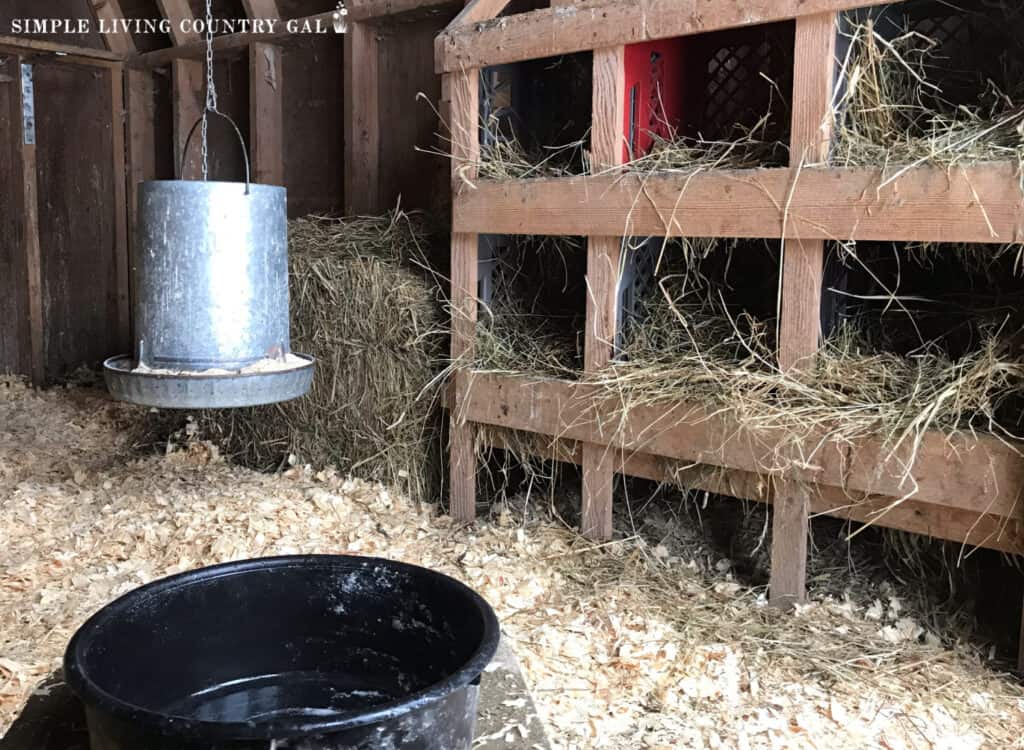
#1. Milk Crate Nesting Boxes
This is my personal favorite, we made our nesting boxes out of milk crates 15 years ago, and they’re still going strong! They’re durable, washable, and easy to set up with a simple wooden frame.
Dimensions we used:
- Openings: 8″ high × 11″ wide
- Legs: 6–8″ off the ground
- Full setup: 46″ high
- Top hinged lid: 16″ high × 42″ long
Supplies Needed:
- Wood for the frame
- Plastic milk crates
- Hinges for the lid
- Nails or screws
- Small handle for the lid
- A few short boards to use as “egg savers” in the front
Instructions:
- Decide how many boxes you want (6 crates will work for 16–25 hens).
- Stack the crates in two rows of three and measure.
- Build a frame that’s wide enough to enclose the crates and raises them 5–8″ off the ground.
- Leave enough room at the top so crates can slide in and out for cleaning.
- Attach the legs to support the frame. Cut the tops of the legs at a slight angle so hens can’t perch on the lid (which keeps it cleaner).
- Add a hinged lid on top and attach a handle for easy lifting.
- Place a small board at the front of each crate opening to keep eggs from rolling out.
Why this works: Milk crates are sturdy, cheap, and easy to clean. The wooden frame gives them stability, while the lid makes egg collection and cleaning simple.
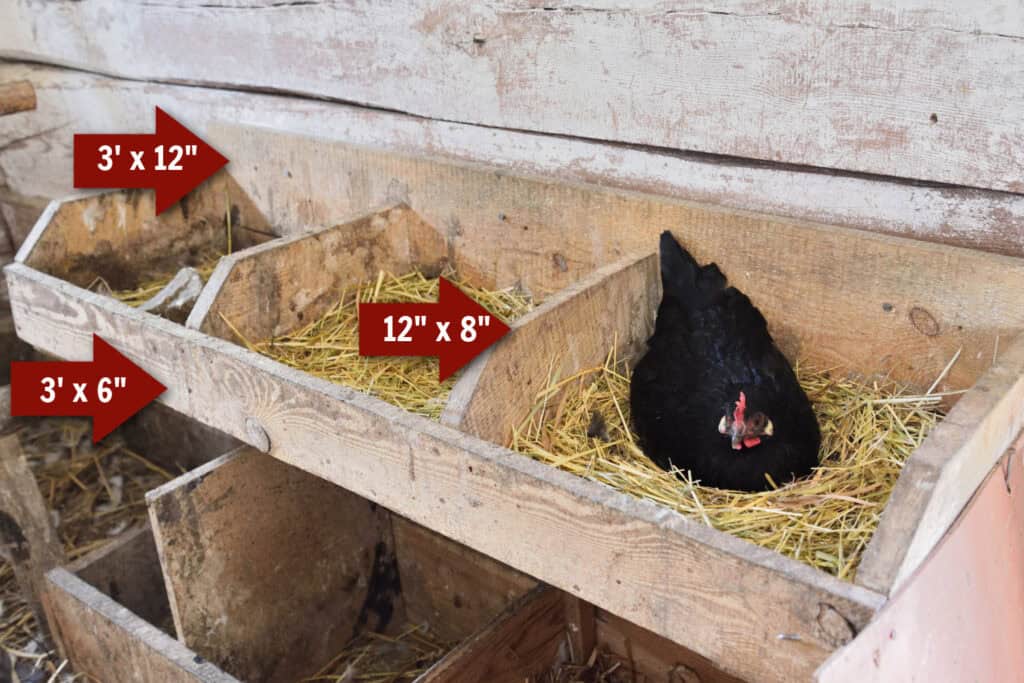
Wood Nesting Boxes
If you live in a milder climate, this open-style shelf setup is perfect. It’s basically a long flat shelf with dividers to create separate “rooms” for your hens.
Supplies Needed:
- One board, 3 ft × 12 in (base)
- One board, 3 ft × 6 in (front lip)
- One board, 3 ft × 12 in (back)
- 4 partition boards, 12 in × 8 in
- L-brackets and screws
Instructions:
- Decide how high you want the boxes (make sure your hens can reach the top one).
- Mark the spot and secure L-brackets to the coop wall.
- Attach the backboard to the wall.
- Screw on the base board, resting on the brackets.
- Add partition boards evenly across the shelf.
- Attach the front lip to keep eggs from rolling out.
Why this works: It’s simple, inexpensive, and uses scrap wood. The open design makes it easy to collect eggs, though it’s best for warmer climates.
3. Nesting Buckets
If you’ve got extra buckets lying around (and most of us do!), you can turn them into nesting boxes in minutes. Five-gallon buckets work best.
Supplies Needed:
- Buckets – 5-gallon recommended for a horizontal setup
- Buckets – 3-5-gallon recommended for vertical setup
- Wood or metal brackets to secure them
- Screws or nails
- Bedding material
Instructions:
- Lay the bucket on its side so the opening faces out or on end with the opening facing up.
- Secure the bucket to the wall with brackets so it doesn’t roll. You can also wedge it between two pieces of wood for extra stability.
- Add a small board across the bottom of the opening to keep bedding and eggs inside.
- Fill with straw or shavings.
Why this works: Buckets are the perfect size, easy to clean, and keep hens cozy. Just make sure they’re secured well, otherwise you’ll end up chasing runaway buckets (and eggs!).
Final Tips for Nesting Box Success
- Bedding matters: Use soft, dry bedding like straw, pine shavings, or shredded paper. Replace it often to keep boxes clean.
- Add a lip or front board: This keeps bedding (and eggs) from spilling out.
- Keep boxes off the ground: About 6–12 inches is perfect. Higher boxes may be harder for smaller hens to reach.
- Discourage roosting: Slant the tops of your boxes so chickens don’t perch and poop on them.
- Location, location: Place boxes in the quietest, dimmest part of the coop. Hens prefer privacy when laying.
When it comes down to it, chickens aren’t picky, they don’t need expensive, store-bought nesting boxes to be happy. What they really need is a safe, cozy space that feels private and inviting. With just a little creativity and a few supplies you already have on hand, you can give your hens exactly that without spending much, if anything at all.
Whether you go with milk crates, wooden shelves, or even repurposed buckets, the key is making your nesting boxes practical, easy to clean, and comfortable for your flock. Keep them filled with fresh bedding, raise them off the ground, and check them daily, and you’ll have healthy, unbroken eggs waiting for you each morning.

Don’t worry about building the “perfect” setup, your hens will quickly let you know what works for them. And remember, raising chickens is about working with what you have and finding simple solutions that make life easier.
These DIY nesting boxes are just one more way to keep your homestead affordable and functional, while still giving your flock the care they deserve.