When Chicks Outgrow Their Home
When I first brought home our very first baby chicks, there was one thing I was just not prepared for. How quickly they would grow.
Baby chicks grow fast.
I mean really, really fast.
And that makes perfect sense to me now since basically, their only job this early in life is to eat and cheep (is that even a word?) and eat some more. So what do you do when your chicks outgrow their home?
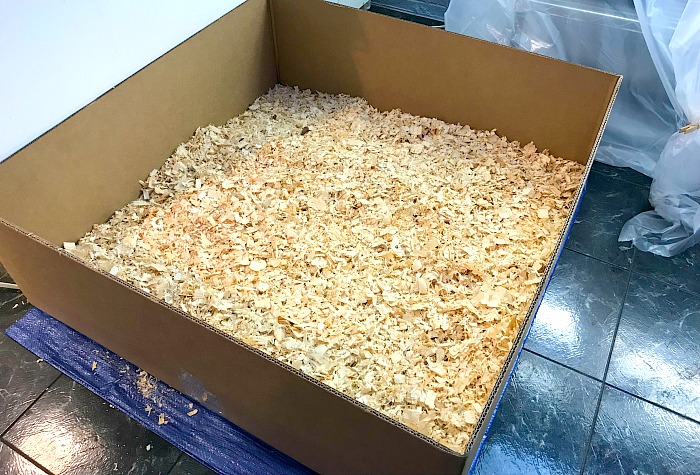
When I got my last batch of chicks I had them in a tote with a layer of wood shavings. I usually use a cardboard box, but wanted to try something new that particular year.
It was a complete disaster and I no longer recommend using totes for chicks. The reason for the disaster was the slipper surface of the tote. Not a good surface for a chick when learning to walk.
READ: CURLY TOE IN CHICKS. WHAT IS IT AND HOW TO PREVENT IT.
I wisely decided to go back to the reliable cardboard box. I really do feel this is the best housing option for chicks and ducklings alike.
Hubs found a perfect box that was both large and shallow. It was easy to clean and held the chicks quite comfortably for the first few weeks.
However, as I mentioned above chicks grow quickly and if you are not prepared this can catch you pretty much off guard.
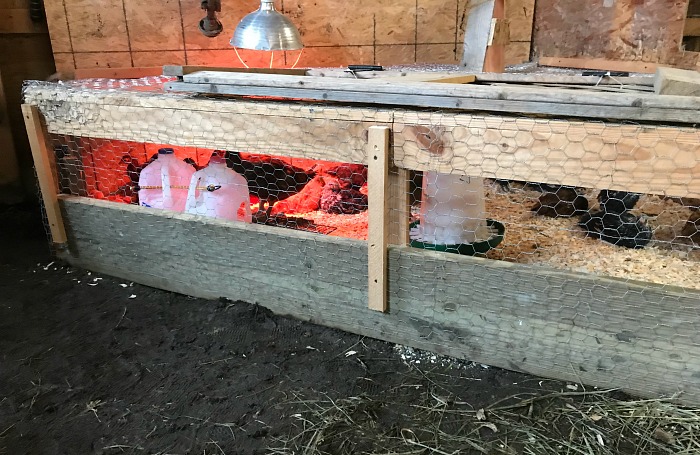
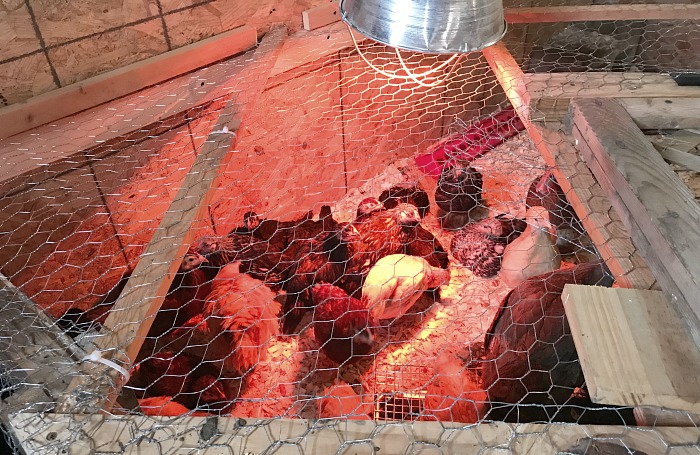
Just as soon as the weather warmed up we prepared to move everyone out to the barn. This would be their temporary new home until they were large enough to incorporate into our flock.
Until they were ready, we needed to find a safe and secure setup that we could use again and again.
Before we dive into the new setup let’s review just how to house your baby chicks.
When setting up chick housing, a few things to remember.
Tip #1 Choose a container that has a non-slip surface.
Your best option is a cardboard or wooden box with high sides to keep your chicks better contained. By using a container of cardboard or wood you will ensure it has a bit of a rough surface that will allow your chicks to walk without feeling they need to “grip” the floor to keep from slipping.
Tip #2 Put in a nice layer of bedding.
I suggest putting down a layer of newspaper, then a nice layer of wood shavings. (do not use cedar)
Be aware that you will need to clean the bedding daily even with very small chicks. Not necessarily a full cleanout of their brooder but at the very least remove the soiled bedding and add fresh as needed. Chicks are dusty even the tiny ones, and dust can cause respiratory problems very quickly in a little chick.
Tip #3 If the sides are lower, you will need to use a “lid” to keep the chicks from flying out.
Little chicks can jump much higher than people think so a lid is essential in order to keep everyone inside where it is safe. I have used window screens, chicken wire, or even a piece of wire shelving as a lid on our chick’s home. Remember, anything is fine as long as there is plenty of ventilation.
Tip #4 Include a thermometer to regulate temperatures.
You need to start at a 95 degrees temperature inside of your brooder when the chicks are very young. You can reach this heat by using heat lamps or heating mats. Please be very very careful if you choose to use a heat lamp. More fires are started with these lamps that many are aware of. These laps get hot, very hot. Use care and be sure your lamps have a protective guard and are secured at all times.
You will want to decrease the temperature by 5 degrees every few days beginning at 2 weeks of age. This will help your chicks acclimate to the outside weather more easily and better prepare them for the big move to the chicken coop.
Tip #5 Provide fresh water and food daily and up out of the bedding to keep things clean.
It is important to keep water and food clean from debris that can easily fall in with active chicks. I have found the easiest way to do this is to elevate the waterer and feeder up a few inches from the main floor. You can easily do this by placing the water and feed up on a small wooden block. The extra few inches will keep the chicks from pooping in their water and feed bowls and will also keep bedding out at well.
Be aware that even if you elevate your feeders they will still need to be cleaned out twice a day.
In our brooder, we like to use these chick waterers and feeders. They are really inexpensive and will last for years.
Tip #6 You can install a roost, but it is not necessary.
Roosts are not a necessity this early but it is a great way to keep your chicks entertained. It will also help them to learn how to get their footing early on.
Just a small stick or branch that is raised up off of the ground is all you need.

Checklist for new coop when chicks outgrow their home.
#1. It does not need to cost a fortune.
This is the mantra of any homesteader. Use what you have and make do with what you’ve got.
Our temporary coop project was made with scrap pieces of plywood and the wood from a bed frame we were going to throw away. Yes, this chicken house is made with a bed frame. 🙂
#2. It must keep the chicks safe from predators.
Above everything else, you need to make sure there are no gaps in your new coop. Cover up any holes you find with spare boards or chicken wire. Rather than being concerned with pretty put all your focus on safe and secure.
You might be surprised at the size holes a rat, snake, or even a weasel can fit through.
You have one goal. Keep the chicks in and anything dangerous out.
For our coop, we used chicken wire to cover all the open areas being sure to secure the ends with fencing nails. Using chicken wire for the top insures good airflow.
Our goal is to have good airflow yet keep the chicks warm until the weather improves.
Having the walls exposed will also ensure air can circulate allowing it to stay fresh so the chicks are not breathing stale air.
This is one of the reasons why chicks, and hens for that matter, get sick. Poor or stale airflow.
#3. Ample room to house them until they can be moved to the hen house.
Baby chicks will need approximately 2 square feet each when they are very small but you will need to increase that as they grow. I would plan on about 3-4 square feet per chick for their temporary housing.
Grown chickens require 10 square feet if they are mainly kept inside the coop. If they are free-ranging you will not need nearly as much room.
READ: HOW TO CONVERT A SHED INTO A CHICKEN COOP
#4. Have a spot for food and water.
You can purchase chicken waterers for this or simply make your own.
I buy my waterer for my baby chicks like this one and then use this one for my grown hens. For the temporary housing, I find these milk jugs work perfectly.
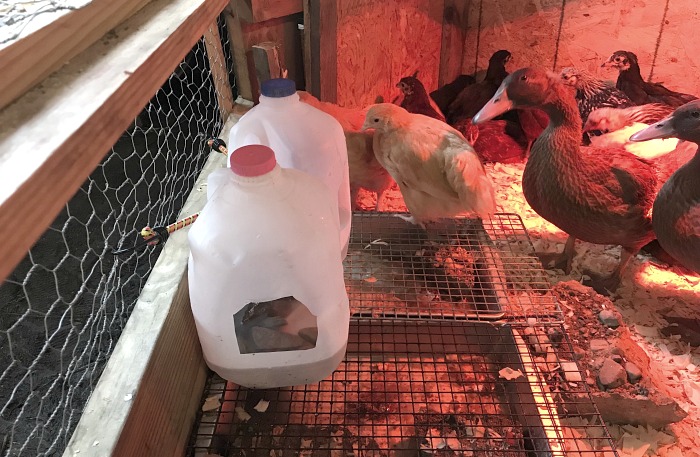
SLCG PRO TIP: Place the water jugs on top of cookie racks that are on brownie tins. This really keeps the mess under control. You can also add a few clean rocks to the jugs to help keep the splashing down to a minimum.
#5. Is easy to get into so it can be cleaned.
Like I mentioned above it is important to keep things clean so your chicks stay healthy. I had tried other temporary chicken coops before and found them so hard to clean out.
The trick is to have a way for you to get in and out from the top and a way for the chicks to get in and out from the bottom. This not only gives you access to clean it but also a way for the chicks to get out and move around while you are cleaning.
Don’t worry about them wandering too far off. Usually, they stay close by since their home is their safe place. But to be on the safe side I would close any doors or put up a few temporary boards if needed.
#6. Keep things warm as the chicks adjust.
Make sure if the weather is cold that you have a warm spot for your chicks. A heat lamp is a good way to do this but it is important to make sure you have a safe way to do so as I mentioned earlier.
We secure our heat lamps by first tying them off and then locking clamps securely in place with zip ties. This is another reason to close off the tops with chicken wire, as the last defense to a falling heat lamp.
Remember, heat lamps are one of the top causes of barn fires so please make sure yours is used safely.
#7. Has a door for the chickens to get out for those days when you want them to get some sun.
Letting your chicks outside to play in the grass is a great way to get them used to the world and to you. A few minutes out while you are cleaning, feeding, and watering each day is enough to help them acclimate to the outdoors.
Remember to keep a close eye on your chicks so they are always safe.
How long will your chicks be in this new housing?
Until you are ready for them in the coop. Usually, most chickens will begin laying their first eggs anywhere from 5-7 months old. It is best not to put them into a coop with older hens until they are old enough to fend for themselves.
We purchase new hens every other year. This ensures that we are always at peak egg production. Most hens will lay eggs consistently for 3 years then begin to taper off. Since we sell our eggs to offset our farm’s feed costs it is important that we always have a reliable steady supply.
For that reason, we are always bringing fresh young layers to replace our older hens.
One last tip. Be sure to check your chicks daily for any signs of distress or injury. As always our animals depend on us for the best care, so watching for any signs no matter how small will help you stop things before they get out of hand.
READ: HOW TO TELL IF YOU HAVE A SICK CHICKEN
Very nice article, however, I think a lot of us hope that ‘replacing’ your old gals with fresh new ones does not mean you are discarding or killing them because their lives are no long of value. These old gals deserve a quiet loving retirement, for all the $, love and entertainment they have provided you and your family, but otherwise a wonderfully, informative article.
I understand your concern but please, in turn, understand why we homestead, and that is mainly to raise our own food. In this case, yes, our chickens, pigs, cows and other livestock are most definitely our food. To justify this we work very hard to give our animals a loving and healthy environment for their entire stay on our farm. This is more than they will possibly get in larger institutions and because of that, I feel that they are living a much better life in our hands. Retiring animals is just not realistic nor is it the purpose of any farmer or homesteader.
I want you o get chickens but I’m wondering if using a cardboard box is the best option, is it okay to use a cardboard box?
I use a cardboard box for the chicks only, as they grow you will need to come up with something more durable. You can use a box until they are about a few months old. It all depends on the breed, how many you have in a box, and how quickly they grow.
I hope this helps!
Tracy Lynn
When you move the chicks to their new temporary home around 6 weeks, are they inside or outside??
Hello, Tori!
It all depends on the weather really. If your chicks are at room temp, meaning you have decreased the brooder temp by 5degrees each week until you reach outside temps, then yes. I would still keep a source of safe heat out there to ensure they are warm enough. If not, then I keep them in longer until they are better able to handle the outside weather. I know, not quite the answer you may have wanted, but cold can kill young chicks so it is important to ensure they are warm until they are old enough to handle the weather at night.
Tracy Lynn
Should we wait to move chicks to coop when they grow their real feathers? And will they still need a heat lamp then?
I would wait to move chicks until they are old enough to fend for themselves. Around 6 weeks. If you live in a cold climate you will need a heat lamp, but the weather now is summer so you should be fine.
Tracy Lynn
HI Tracy,
I love eggs. I can not have raising chickens because I am allergic to the feathers. like Guinea pigs, geese, etc. FEATHERS. Mice, etc. So do you have any idea how can I raise chicken some day?
My cousin brought the chickens to a children museum years ago to education the children to learn about the chickens. Many cute yellow chickens come out of the eggs. Later on, what to do with chickens when become adults. So, my grandmother always willing to take care of any. She was willing to take care of the chickens however the chickens become ALL roosters, not hens! AHHHHHHH. The biggest problems! We never had hens or eggs! Roosters were terrifying and mad to each other. We couldn’t save all down to few. They ruined the pretty GREEN grasses!
p.s. My question is how do you really know which Fe/male?
Unfortunately, no feathers allow for me. Unless you have some idea? That would be great.
Thank you so much!
To tell the difference with chickens as far as their sex you will need to wait until they are older. Roosters tend to be more colorful and have much longer tail feathers. In the beginning, they all look the same as chicks. 🙂